|
|
|
Kto jest w sklepie?
Sklep przegląda 5950 gości |
|
Kategorie
|
|
Informacje
|
|
Polecamy
|
|
|
 |
|
|
Dla tego produktu nie napisano jeszcze recenzji!
 ;
Wszystko w porządku.
Instrukcja czytelna i kompletna.
Dziękuję.
all right!
thank you.
;
Bardzo dobra instrukcja. Zawiera wszystko co potrzeba, polecam!
 ;
Instrukcja jest OK. Schematy czytelne, opisane niektóre procedury.
;
Instrukcja bardzo czytelna. zawiera co potrzeba. Polecam
;
...instrukcja serwisowa w pełni czytelna i kompletna. Dziękuję!
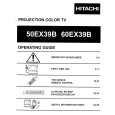
Table 2-17-l. r
lynamic convergence
stment Item
adjustment
Adj. VR
of the horizontal
line (RED/BLUE).
Adjustment Details
RED 1 BLUE
H
2
1
Horizontal center line
Vertical Veritcal
skew V-SKEW bow V-BOW
1 RU25
1 RU53
1
Remove Correct straight
the inclination the bow distortion line. the bow distortion line. the inclination the bow distortion line. the inclination
of the horizontal of the horizontal
center
line. line and make it a
I
center
I-
Upper/lower pincushion distortion V-PIN Upper/lower keystone distortion V-KEY Upper pincushion distortion V-U-PIN
RU05
RU33
Correct straight Remove Correct straight Remove
of the lower horizontal of the lower horizontal
line and make it a line. line and make it a line.
RU13 RUOI
RU4�l RU29
of the upper horizontal of the upper horizontal
7 H
8
Upper keystone distortion V-U-KEY Vertical
Upper/lower horizontal line
size V-SIZE linearity V-LIN
RU09
RU37
Match upperflower the vertical size. Match upper/lower the linearity.
horizontal horizontal
line with the green line by changing line with the green line by changing
Vertical
Note:
1. Adjustment procedure of the horizontal lines (I) Center, (2) Lower, (3) Upper and then (4) Upper/Lower. 2. Accurately match the horizontal center lines (red/blue) with the green line using the centering magnets (item 2.7). 3. The adjustment VRs shown in items 7 and 8 of above table (RU19, RU47, RU17, RU45) as well as BVCenter (RUP4), BH-Center (RUP8), RV-Center (RUQS), and RH-Center (RUQ7), should have been set to their mechanical centers previously.
Dynamic
Adjustment
Table 2-l 7-2.
convergence
Item
adjustment
of the vertical
line (RED/BLUE).
Adjustment Details
II
1 2 Vertical center line
NO.
T
skew H-SKEW bow H-BOW RU82 RU80 RU61
Horizontal Horizontal Left/right distortion Left/right distortion
II
1 RUE1 RU90 1 RU98 RUA6 RUA3 RUK2 RU86
RUE3
Remove Correct straight Correct straight Remove Extend side.
the inclination
of the vertical
center
line. line and make it a line and make it a
the bow distortion line. the bow distortion line. the inclination 2nd vertical
of the vertical
center
pincushion H-PIN keystone H-KEY size H-SIZE linearity H-LIN
of the right side vertical of the right side vertical
RU69 RU76 RU73 RUJ3 RU57
line. +
5 6
Right side vertical line
Horizontal Horizontal ;igRhE;d --
line from the left/right
Match 2nd vertical line from the right end with green line. Match right end line with the green line. line and make
1) �
line linearity
8 9 -10 11 Left side vertical line
Left pincushion distortion H-L-PIN Left keystone distortion H-L-KEY Left horizontal size H-L-SIZE FF_ _;;,� line linearity
Correct the bow distortion it a straight line. Remove Match line. the inclination left side vertical
of the left side vertical
RU65 RULl RUJ7
I
RU94 RULS RUK6
I
of the vertical
line on the left side. rv I
line with the green line with the green
h$a$h lefl end vertical
+
Note:
1. 2. 3. 4.
Adjustment procedure of the vertical lines (1) Center, (2) Right, and then (3) Left line. Accurately match the vertical center lines (red/blue) with the green line using the centering magnets (item 2.7). The adjustment VRs shown in items 5, 6, 7, 10 and 11 (RU76, RUAG, RU73, RUA3, RUJ3, RUK2, RULI, RULS, RUJ7 and RUKG) as well as RH-Center (RUQ7), BH-Center (RUP8), should have been set to their mechanical centers previously. Including centering magnets, adjust repeatedly as required.
27
|
|
|
> |
|